Garmin 496 Installation - TB20 Aircraft
This article was originally written in 2005. The Garmin 496 was chosen primarily for its terrain database and the terrain warnings being generated as spoken audio output which can be connected to the aircraft intercom. This provides a low cost but effective terrain warning system, based on a terrain database similar to that of much more expensive certified products. The GPS also provides a navigation backup in case of a total electrical failure in the aircraft.
For regulatory/certification reasons the GPS is and must remain a removable item although the exact requirements will vary according to the country of aircraft registration. The aircraft in this case is not UK registered. Probably anyone can hang a GPS somewhere and plug it into the cigar lighter socket, but before contemplating a clean installation like the one described here it's important to check with the appropriate certification authority what is and is not possible. Most things are possible even on a G-reg - at a substantial price for the paperwork.
The Garmin 496 is one of the best handheld GPSs on the market. It is rivalled only by the Avmap EKP IV which has a much bigger screen and thus offers better situational awareness but is unfortunately poorly supported in the UK, leaving the distributors to support the unit without any help from the Italian manufacturer. In this installation, the primary navigation device is a panel mounted IFR GPS (see pic below) and the choice of the 496 should be seen in that context. Personally - and this is highly debatable - I would not have chosen something as small as the 496 if it was my only GPS.
Following a recent CFIT of a Seneca in the Vercours mountains in France, a few of us have looked at the subject of terrain warning (TAWS / EGPWS) and the Garmin 496 data has been found (initially, on simulated tracks into terrain) to be very accurate in elevation and accurate in whether the terrain conflict is real or merely a near miss. This finding is what led to the installation described here. In complete contrast, the Jeppesen elevation data found in products such as Flitestar, Jeppview, Flitedeck, and which is used in nearly all aviation GPS units for map colouring and spot elevations, has been found to be so grossly inaccurate (elevation errors up to 3500ft) it is hard to believe why they make it available at all. According to Garmin UK, the elevation data in the 496 is based on the SRTM radar imagery and is accurate to 100ft in the USA and 300ft elsewhere. It is further evident that Garmin have modified this data to fix-up spot elevations. The result is very good indeed and in most respects comparable to the most expensive terrain warning products available to GA pilots, some of which are 10x more expensive.
Mechanical Installation
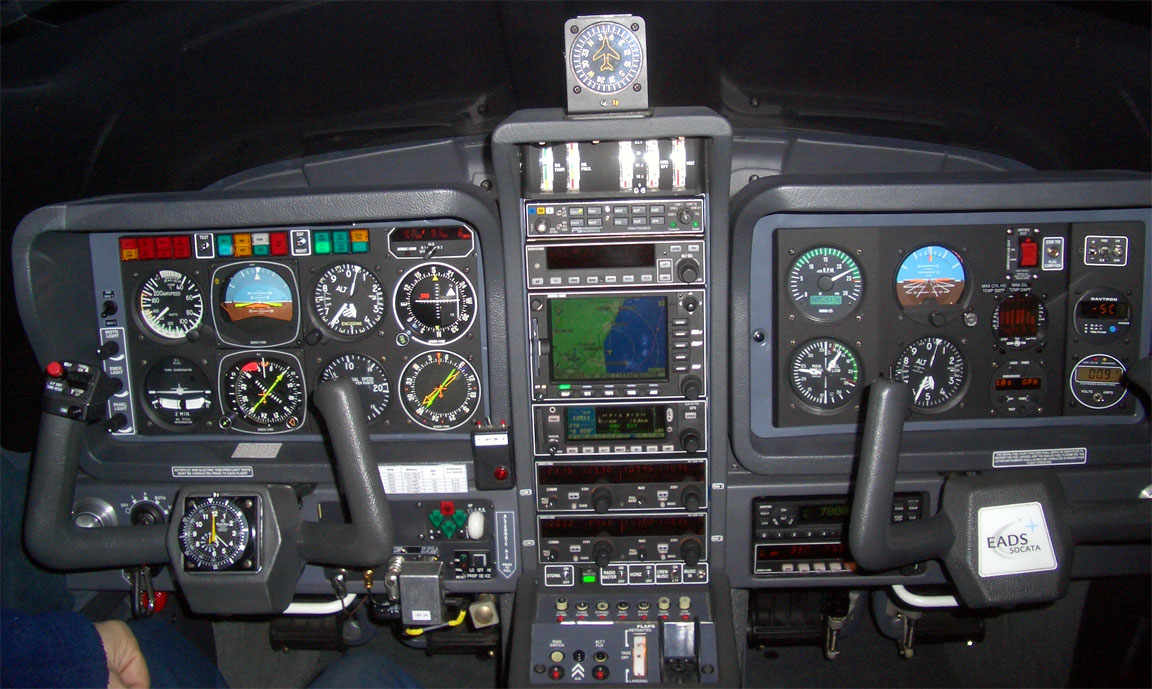
The original cockpit looked like this
The clock shown above is an aftermarket item; not the original Socata fit which was a rather unreliable Astro-tech LC-2 digital clock. However, their sizes are the same and to make it really easy the new clock was mounted on top of the remains of the old one, whose back portion is simply a push-fit into the yoke centre moulding.
Firstly, the clock was moved to the right-hand yoke, by swapping over the two removable sections in the middle of each yoke. These are made of grey rubberised plastic and each is held in place from behind with three screws. This operation was probably made easier by the new clock being a battery-powered type so eliminating the need to bring through the wire which brings constant power.
Then, the Garmin mount (which comes with the retail kit) was fixed to the new left-hand plastic section:
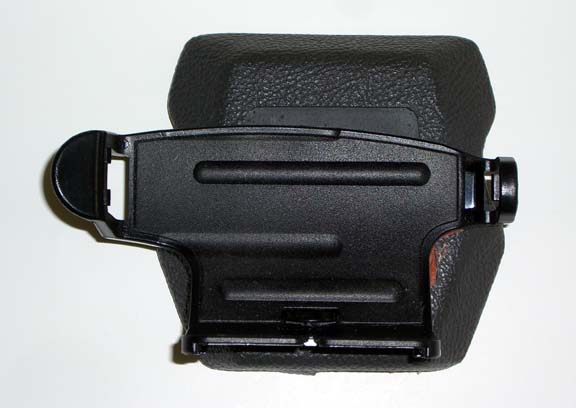
The four M4x20 screws (hidden in the above picture by the self-adhesive rubber insert which had to be temporarily removed to fit them in) are visible in the underside view:

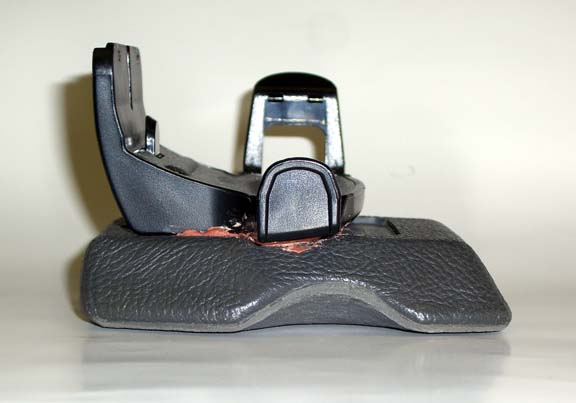
The red material is a trade gap filler called Pinkgrip, which is a reasonable general purpose adhesive used by cowboy builders to put together everything from gutters to complete houses. It was used here to fill the gap between the two components, which otherwise do not mate up very well due to uneven/curved surfaces.
The side view of the above assembly is below:
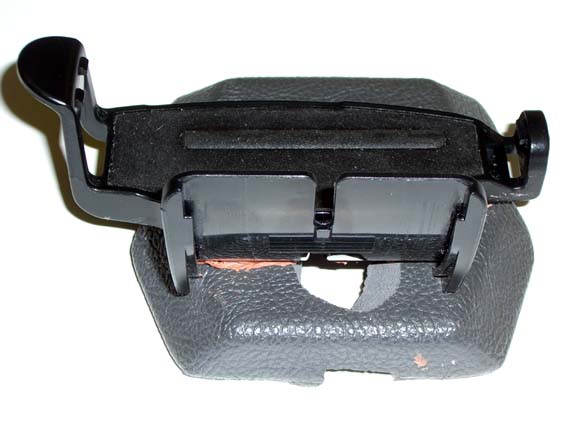
and the following picture shows the cut-out which was made in the plastic section to let the cables through:
The end result is very neat
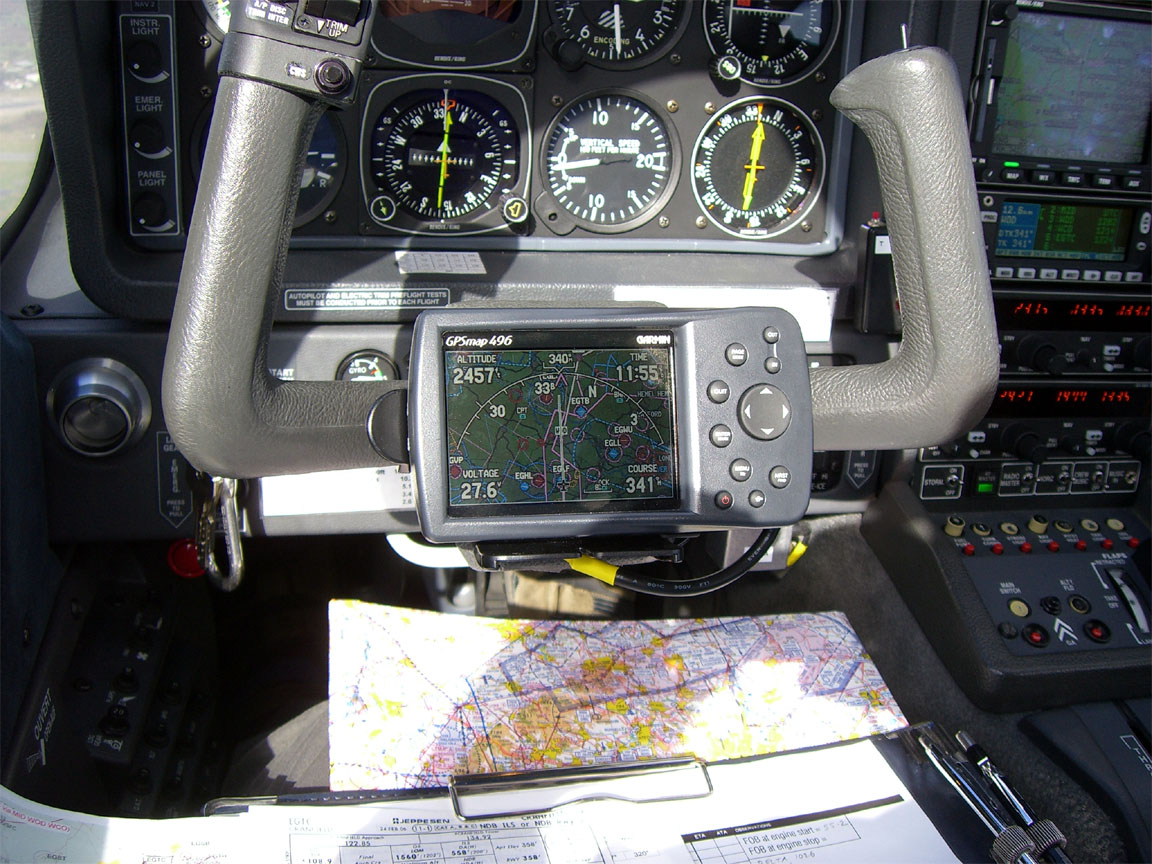
It is far cleaner than using the massive "Russian combine harvester" yoke mount which comes with the Garmin 496 kit: The GPS can be removed in seconds, though in practice it is not necessary to unplug the cables from it; one needs to loosen it only far enough to make a USB connection so the database can be updated from a laptop. This is just as well since the Garmin multipole connector is extremely tight and would fall apart if disconnected frequently.
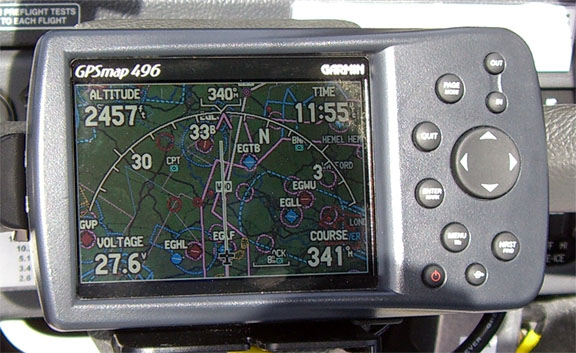
To minimise reflections, it's desirable to have the GPS screen tilted downwards a few degrees more than would initially appear to be correct. This is achieved when the GPS screen is parallel to the front surface of the Socata plastic moulding. However, the sunlight readability of this GPS is outstanding, as the following pic (taken in direct sunlight) shows:
Connections
These involved a bit of trial and error, due to lack of any information from Garmin beyond what was in the user manual.
Three connections were made to the GPS:
a) Power in (from aircraft)
b) Audio out (to aircraft intercom)
c) Antenna (to GPS)
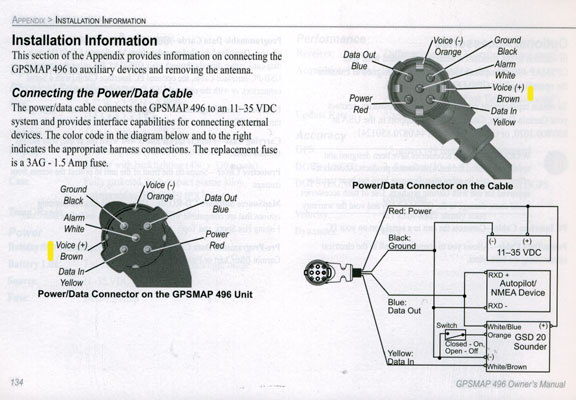
The Garmin 496 has a dedicated audio output jack but we could not find out the connections, or even whether it was mono or stereo. Suprisingly, Garmin didn't appear to have any data beyond what is in the user manual. However, there is no need to use the 3.5mm jack as the connections a) and b) can both be made entirely through the multipole cable; this has two wires for power, two wires (marked +voice and -voice for driving a remote 8 ohm speaker), plus other (mostly RS232) connections which were not used. The following is from the user manual and shows the multipole connector connections; the relevant audio output terminals are marked in yellow
The multipole lead we used was the one which came with the kit, which had the large cigar lighter plug (with the integral speaker) on the end; we cut off the cigar lighter plug. The lead has just the four wires in it. Garmin do sell a proper multipole cable for this kind of installation: P/N 010-10513-00. This has an inline fuseholder, but in any aircraft installation one needs to have a dedicated circuit breaker anyway. Also this lead was not UK stocked at the time.
The GPS audio output was connected to the AUX input of the PMA7000 intercom. This enables the warnings to be enabled/disabled easily using the AUX button on the intercom. Whether this is a good idea with terrain warnings is debatable, but the GPS will generate other kinds of audio warnings too and these may be undesirable... time will tell.
The PMA7000 wiring diagram shows the AUX input on pin 11. The TB20 wiring diagram for the PMA7000 shows that the AUX input is not connected (P1 is the relevant connector on the TB20 diagram) so thie AUX input was available. The +voice audio output of the GPS was connected to pin 11 of the intercom, and that was the audio connection done.
Of the two audio output terminals mentioned above, we discovered that they come from what is almost certainly the output of a bridge amplifier output stage. To obtain a single ended signal, one connects to +voice, leaving -voice unconnected. The power ground wire doubles up as the audio ground - a technically tacky solution but one which works fine for the large signal levels involved. An electrically neater solution would have been to feed +voice and -voice into a small audio transformer... Its not obvious why Garmin chose to use a bridge output stage for the external speaker; perhaps they did it to prevent audio currents flowing in the power ground lead and causing audio feed-through problems with other equipment - a good solution to often poor aircraft wiring. If one does what Garmin suggested and ground the -voice terminal, the sound output doesn't work and you get a rough type of low frequency noise coming out instead; this is probably because one is shorting the output to ground and some kind of internal overcurrent cut-out turns the amplifier on/off rapidly.
The power terminals were connected to the aircraft power in the obvious manner, via a dedicated 5A circuit breaker in the +28V supply line which was fitted some time previously for a general-purpose power outlet and for which certification was obtained at the time.
The external GPS antenna which comes with the Garmin kit was mounted on top of the instrument panel, where it gets a good view of the sky. A rooftop antenna would have been even better but this aircraft already has two of those, and such an operation requires expensive certification. The reception was found to be excellent.
It's necessary to make the connections very neatly to ensure that control movement is not affected, and that the wiring will not be damaged by the inevitable regular flexing, and a second inspection of the controls is required by a qualified engineer. The hardest part of the installation was routing the wires through the yoke tube. In fact it turned out to be impossible to bring the ex-Garmin 4-core power+sound cable through, but there were sufficient wires going through there already (originally used for the Socata yoke clock power and illumination) and these were re-used for the GPS power and sound. The antenna cable was pulled through, with considerable effort, but this was a thin (approx 2.5mm diameter) 50 ohm coax; we used the cable which was already fitted to the Garmin antenna and fitted a 50 ohm right-angle BNC plug on the end of it which plugs into the back of the GPS.
To test the installation, one needs to find a way to make the GPS emit sounds out of the audio output. The only easy way of doing this is to go into the SOUND menu and move the volume control up/down; a female voice should announce the current volume setting as a spoken number "one" through "nine".
Terrain Warning Operation
To test the terrain warnings, one needs to either load a route and fly it using the simulation mode, or fly the real aircraft towards a hill (preferably in VMC...). The warnings are generated at two levels: TERRAIN TERRAIN and TERRAIN TERRAIN PULL UP PULL UP according to urgency.
VERY IMPORTANT: It appears that terrain warnings are not enabled until you have selected the Terrain page (using the Page button) and responded with Enter to the disclaimer asking you to confirm you won't sue Garmin if you use it. Just switching the unit on and pressing Enter to get past the first disclaimer is not enough. So, several button presses are required following each power-up, to obtain the expected functionality. However, this behaviour may be firmware version dependent, as Garmin UK state that the terrain warnings should always be enabled.
Garmin won't reveal what rules the Garmin 496 uses to determine terrain conflict. It is believed to disable warnings in the approach areas of airports, and in other circumstances. The unit does have some configuration options: caution elevation, look ahead time, and alert sensitivity for three different parameters (terrain, obstacle and descent rate). It appears that the look-ahead time simply extrapolates the current ground speed to the obstacle, so if you set e.g. 1 minute then at 120kt GS it will look two miles ahead. There appears to be no aircraft performance configuration that might enable the unit to delay a warnning until the point where the aircraft climb performance might become a problem for avoiding the obstacle. However, this decision method appears to be completely satisfactory for all enroute flight (where one should not get anywhere remotely near any terrain) and presumably they disable the warnings near known airports otherwise it would be going off on every approach to land. It's hard to establish how useful for terrain avoidance the unit might be following a botched instrument approach, since we don't know how far away from the airport and/or the published approach paths one needs to be before the terrain warning feature is enabled. In normal operations, the unit generates a spoken "five hundred" warning at 500ft AGL on the final approach, which is nice.
The various configuration options for the Terrain warning feature are poorly documented by Garmin.
In practice, the terrain warning feature works very well. In test flights,
it warned of all the right hills, at the right time, and even when a non-terrain
page is currently being displayed, it pops up a reduced version of the terrain
page showing where the conflict is, so you can immediately see which way to
turn for avoidance. This screen appears even when the terrain warning level
has not yet escalated to the most urgent "PULL UP" status.
USB Driver Installation
This is necessary for updating the database, or for interfacing flight planning software with the GPS. It was found that the Garmin USB drivers (the file usbdrivers_21.exe) for the 496 do not install, despite the install program reporting a successful install. One has to open the executable (which luckily is a self-extracting zip) with Winzip, unpack it into a temporary directory, then when windows discovers the new device and asks where the driver for it is, you have to point it to that directory. This was under windows 2000; other users have reported the same problem under XP.
The unit comes with a database update voucher which is valid for 90 days. This entitles you to one free update of the Jeppesen database, but not the terrain/obstacle database which in the unit I got was about 6 months old.
Overall Impression
This is not intended to be a review of the Garmin 496 but:
Things I like: A very good screen; well designed consistent and fast
user interface; simple and fast USB interface to Jepp Flitestar/Flitemap; well
implemented zoom/pan operation; fits really well into the Garmin mounting bracket
shown above and is easy/fast to insert/remove from this bracket; good (not outstanding)
GPS reception using the integral antenna; outstanding GPS reception (with rapid
signal acquisition) using the separately mounted antenna, loads of features;
most things are configurable. The "all instruments" page is good enough
to control the aircraft in IMC, provided you fly gently. The terrain warning
function is brilliant and would have saved many lives if everybody had this
unit and had it wired into their intercom.
Things I don't like: If the screen was any smaller it would be useless; no Navbox interface (Navbox had enough trouble making the 296 USB one work); doesn't store the zoom factor and screen declutter settings so you always have to fiddle at startup; several of the screens demand separate confirmations asking, in effect, that you won't sue Garmin before you use them; the rubbery multipole connector (used for power as well as other stuff) is very stiff, hard to unplug (needs rocking backwards/forwards to loosen it) and IMHO isn't going to last many insertions, possibly eventually damaging the other half in the GPS; the little integral antenna is difficult/fiddly to remove; inadequate documentation on the connections, signal levels, etc.
The only "showstopper" is likely to be the multipole connector but there is a work-around in the form of cutting the supplied lead and fitting a decent inline connector within it, so the Garmin plug can remain plugged in, leaving just a short length of the Garmin lead dangling from the GPS. For a totally portable application (where you don't want the full length of the charging lead permanently plugged in) I would definitely thus modify the charging lead. The hardest case is a yoke mounted application where frequent removal is desired; here the Garmin connections will just get knackered and I would combine the power/sound/RF connections into a single mixed-contact connector. There are several connector types (starting with the common D type) which can combine normal pins and 50 ohm RF coax in the same connector body and can be placed inline. Skyforce have the same problem; they use a high quality MCX connector for the antenna but recess it so deeply that it needs pliers to remove it ... Feedback from other 496 users suggests that breakages of the multipole connector are commonplace, sometimes leaving a piece of the removable connector stuck inside the 496 housing.
There are significant pilot attention issues with having two very different GPS receivers in the cockpit, as I have here (the Garmin 496 and the KLN94/KMD550). One needs to decide which will be the primary reference; in my case obviously the latter, with the 496 being used to fill in some information. Its "track arc" screen is perhaps the most useful one.A dedicated IFR GPS remains the best IFR navigation reference.
In this application, I am not likely to be uploading routes into the 496 from a PC, not least because the USB connector is inaccessible without removing the GPS from the yoke mount. What I have not yet worked out is how routes which are uploaded to the GPS from a flight planning program fit alongside the GPS's own waypoint database. With some GPSs, the uploaded waypoints reference, whenever possible, named waypoints already within the GPS database. With others, the uploaded waypoints are completely disconnected from the GPS database. I believe the Garmin is in the former category, whereas Skyforce are in the latter category. All IFR GPSs (e.g. GNS430, KLN94) are in the former category; they have to be since they do not have any pilot-accessible route upload! When reactivating a route that was loaded (manually or from a PC) into the GPS some time ago and prior to a recent database update which has deleted some waypoints, a GPS in the former category will automatically delete (sometimes also upon the database update) any obsolete waypoints from the route. Normally, a warning message should appear, and that route has to be replanned. This is regularly seen when airways intersections are used as waypoints, for either VFR or IFR, as many intersections are often used in STARs and SIDs and these are regularly re-arranged.
It is exceedingly difficult to work out exactly how the 496 differs from the 296, and I suspect a lot of the advertisements are worded deliberately to enhance the 496's features even where the 296 has the same features - to justify the big price difference. Also a lot of 396/496 features have been placed in the 296 through undocumented firmware updates. The 496 does appear be be unique in having spoken terrain warnings coming out of its audio output.
Update 7/2013: The 9-pole connector used with the G296/496 products experienced a close-to-100% failure rate in the field, usually leaving the front half stuck inside the GPS and having to be dug out with a screwdriver. This happened to me also, despite hardly ever having moved it. I was able to find two secondhand leads which were not quite broken and could be stuck together with superglue. These were the car power leads sold by Garmin which comprise of a cigar lighter adapter and a small loudspeaker. The cable contains only the power and speaker wires (red, black, brown, orange) but that is all one needs in this case. Garmin do sell a cable which supposedly doesn't fall apart but the plug is straight, not right angle, and is thus not suitable for connecting to a yoke mounted G496. Garmin discontinued the G496 in 2012 and a modern replacement might be the Aera 500 or 550, with the latter offering a "higher resolution" (whatever that means is unclear) terrain database. It is also unclear whether these output terrain warnings on their speaker output...
Update 2/2018: The Garmin 496 was replaced with a Garmin Aera 660. This does the same job, but adds the Garmin Safetaxi which is very useful for not getting lost at airports! It has the same (virtually useless) controlled airspace depictions which cannot be usefully decluttered but does the other main thing - GPWS - the same way. It was also wired to the intercom the same way, for audio warnings into the headsets. It is of course a more modern unit, with wifi updates of the databases and the firmware, etc. More details of the installation are around here.
This article last edited 18th August 2018
Any feedback, reports of dead links, corrections or suggestions much appreciated:
Contact details
